Outbound Contact Center Campaign
What is Outbound Contact Center Campaign?
The Outbound Contact Center Campaign allows you to make calls to the bulk of destinations with one click.
Configure a Campaign
1. Create a Campaign:
In order to create a Campaign, please follow the steps below:
- Go to Communication Hub
- Select Campaign tab > Click on the Create button
- Give your campaign a name
- At Campaign type, choose Outbound Contact Center
- Select a created queue (click here for how to create a queue)
- Select Caller ID:
- Common Caller ID: all outbound calls will take the chosen number as their default caller ID.
- Choose a default caller IDfrom the list.
- Respective extension's caller ID: caller ID is defined as per agent setting.
- Common Caller ID: all outbound calls will take the chosen number as their default caller ID.
- Toggle on to set Campaign run time*(optional):*Your campaign is only allowed to run within this time range.
- Create
 ### 2. Add number list to the Campaign
The maximum quantity of numbers for one campaign is 50,000.
- At the created campaign, click View Numbers
- Click on the arrow icon > download sample number list > fill in the list accordingly
- Upload
 ### 3. Run a Campaign
Once you finish the configuration step, your campaign status is Draft and ready to start.
There are 2 ways to start a campaign:
Start immediately
Click the Start button to run the campaign immediately.
The campaign status will change to In progress if you choose to start Now.

Schedule
Click the Schedule to schedule start dates for the campaign.
The campaign status will change to Scheduled if you choose to Schedulethe start time.

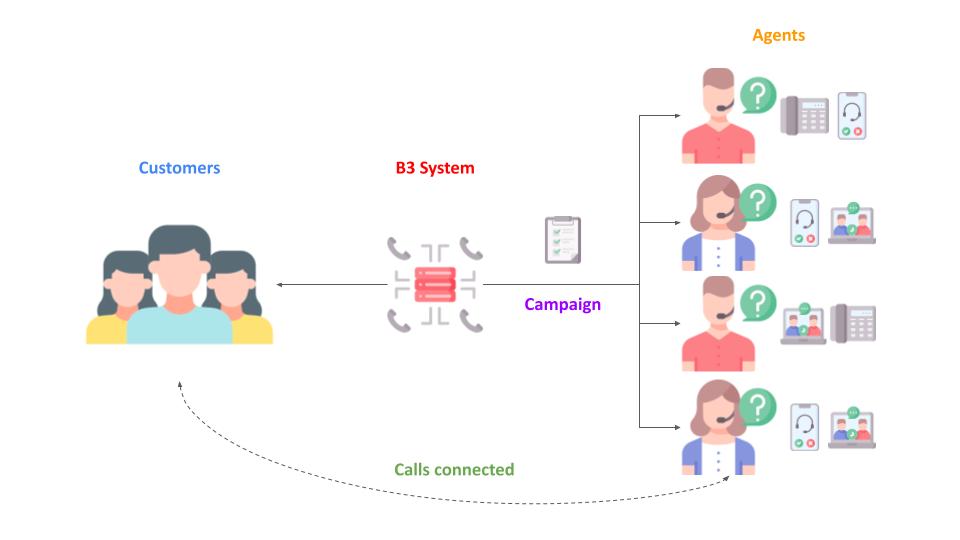
The process with calls
The campaign will run as per the below flow:
- Once the campaign is started, the assigned agents will receive the incoming calls on their logged-in devices.
- TheCaller ID shown on the agents' devices is the Customer's phone number.
- When the agent picks up the call, he/she will be connected to the customer.
- The Caller ID shown on the customer's device is the Caller ID selected when you create the list.
 Campaign Status

Draft
Available actions
Edit
- You can amend the basic information of the Campaign:
- Name
- Queue
- Caller ID
- Campaign run time

View Numbers
- Check number list
- Upload additional numbers.
Schedule
In case you do not want your campaign to start immediately, you can schedule it for another day. Just select the exact Date and Time that you want your campaign to start, then Save.
Start
Start the campaign immediately.
Duplicate
- You can duplicate the campaign to save the setting time.
- Required details:
- Name
- WithorWithouttheNumber List
- Required details:

Archive
You can archive unnecessary campaigns.
Scheduled
Available actions
Detail Campaign
- View details of the campaign.

Duplicate
- You can duplicate the campaign to save the setting time.
- Required details:
- Name
- WithorWithouttheNumber List
- Required details:
Archive
You can archive unnecessary campaigns.

In Progress
Available actions
Detail Campaign
- View details of the campaign.
Duplicate
- You can duplicate the campaign to save the setting time.
- Required details:
- Name
- WithorWithouttheNumber List
- Required details:
Completed
Available actions
Detail Campaign
- View details of the campaign.

Report
- View call history of the campaign.

Duplicate
- You can duplicate the campaign to save the setting time.
- Required details:
- Name
- WithorWithouttheNumber List
- Required details:

Archive
You can archive unnecessary campaigns.